Are you ready to continue with the tutorial on Identity Server? Before getting into the subject, if you want to review everything commented in the first part of the tutorial, click here.
Configuration of the SP in the Identity Server
It’s time to configure the service provider in the Identity Server: Travelocity.
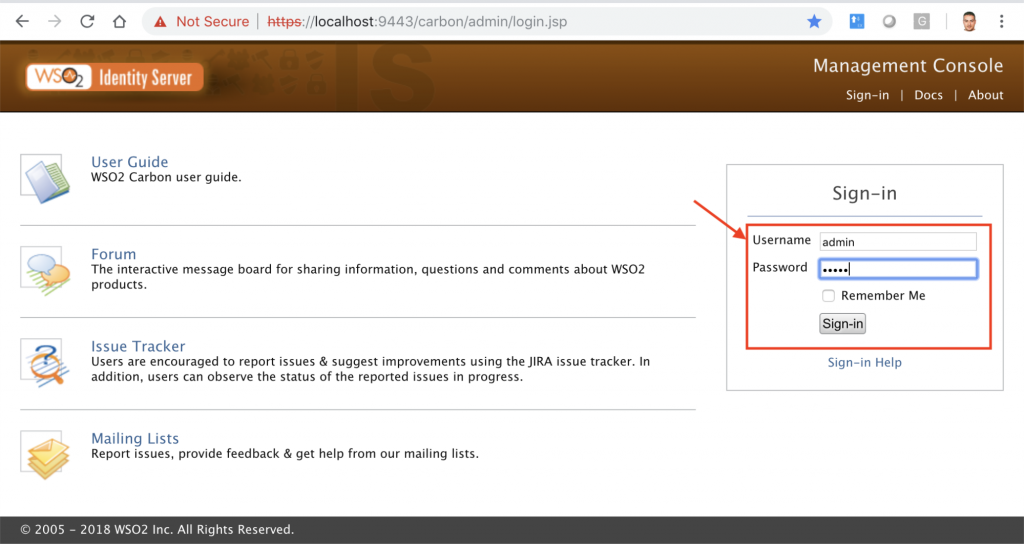
To do this you have to access the Identity Server console: https://localhost:9443/carbon/admin/login.jsp, user and password: admin/admin.
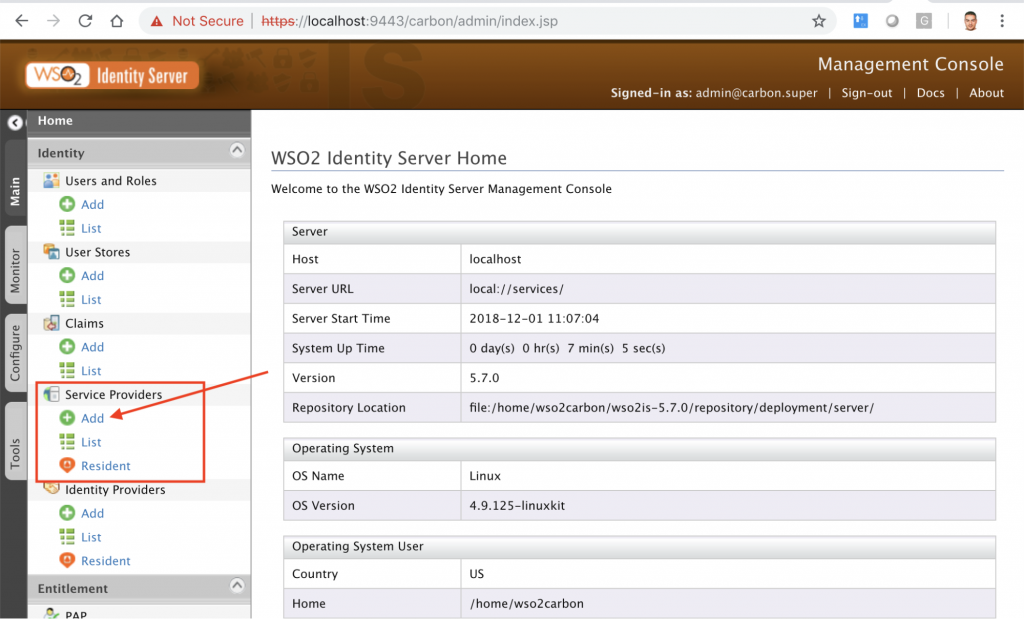
Now select add under the section Service Providers.
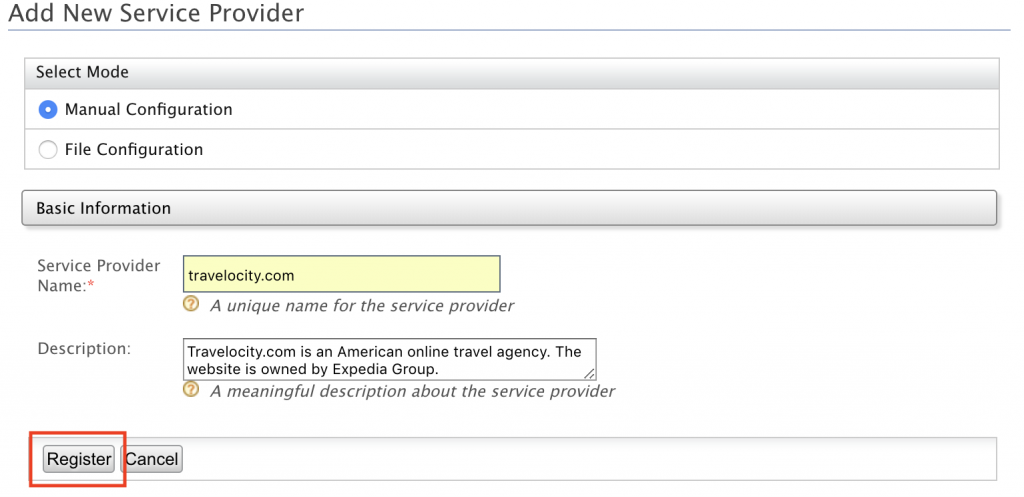
In the next screen, we choose manual configuration mode, you can also import an xml file with all the configuration of the Service Provider.
Our Service Provider Name is: Travelocity.com. Press: Register.
SP certificate
Now you have to import the Service Provider certificate. In the versions prior to 5.5.0 the certificate was imported into the KeyStore, from 5.5.0 the certificate is saved in Database, as we are going to do. This certificate is used to validate the signing of signed requests or requests from the Service Provider in the Identity Server.
In our example they will be SAML2 authentication requests and SAML2 session close. The format of the certificate is the PEM, encoded in Base64 with ASCII characters. You must now obtain the PEM certificate from a JKS file (Java KeyStore (JKS) is a repository of security certificates). For this we must go to the route:
/modules/samples/sso/sso-agent-sample/src/main/resources

In the red box is the JKS file from which we will extract the certificate. To make the export you must use this command:
keytool -export -keystore wso2carbon.jks -alias wso2carbon -file wso2carbon.crt
The certificate appears in the same folder:

The file contains a certificate encoded in binary. Now we must pass it to PEM format. This is the command:
openssl x509 -inform der -in wso2carbon.crt -out wso2carbon.pem
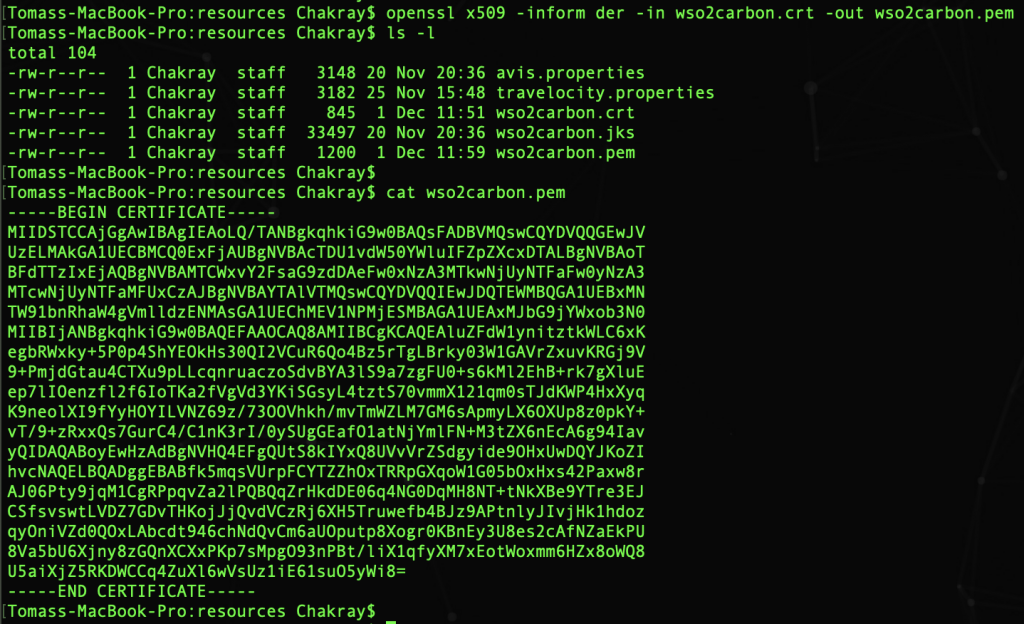
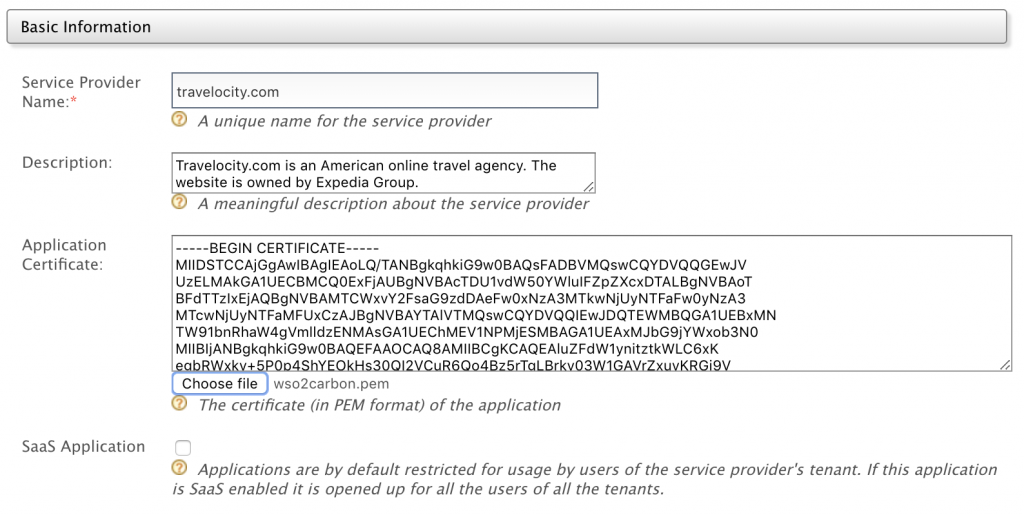
As shown in the image, the content of the certificate is ASCII. Now we import that certificate as: Application Certificate:
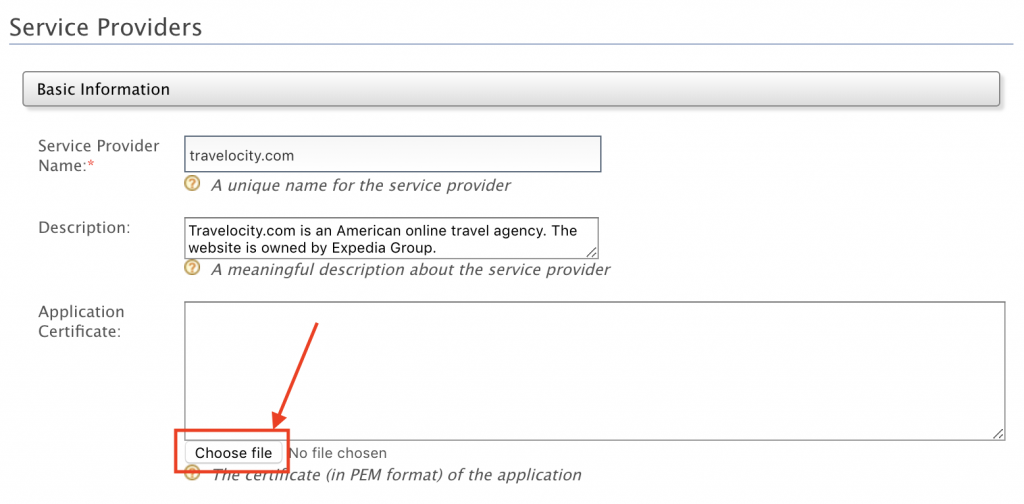
WSO2 gives us the possibility to import the file or make a copy/paste of the certificate within the frame.
Registration of the new SP
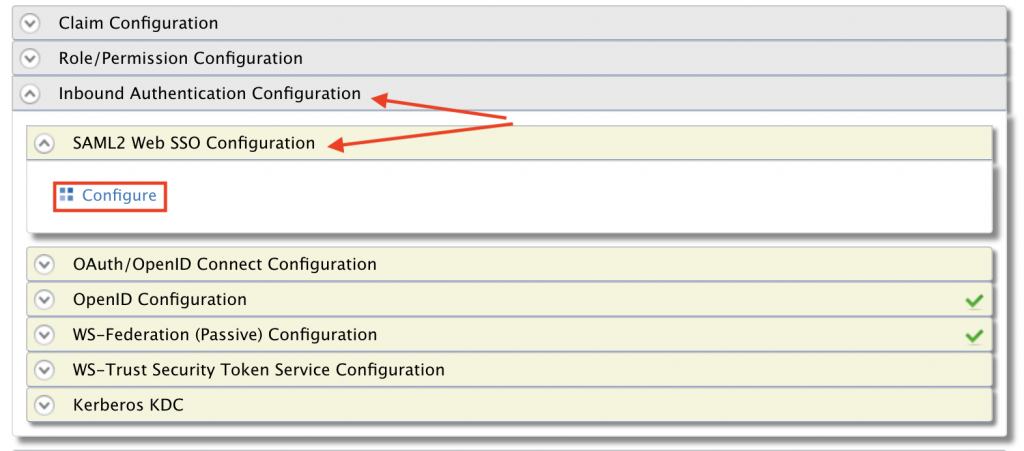
Now you have to go to the section Inbound Authentication Configuration and within it SAML2 Web SSO Configuration. Click on Configure:
In the next screen choose also manual configuration and enter the data as shown in the screen below and at the end click: Register.
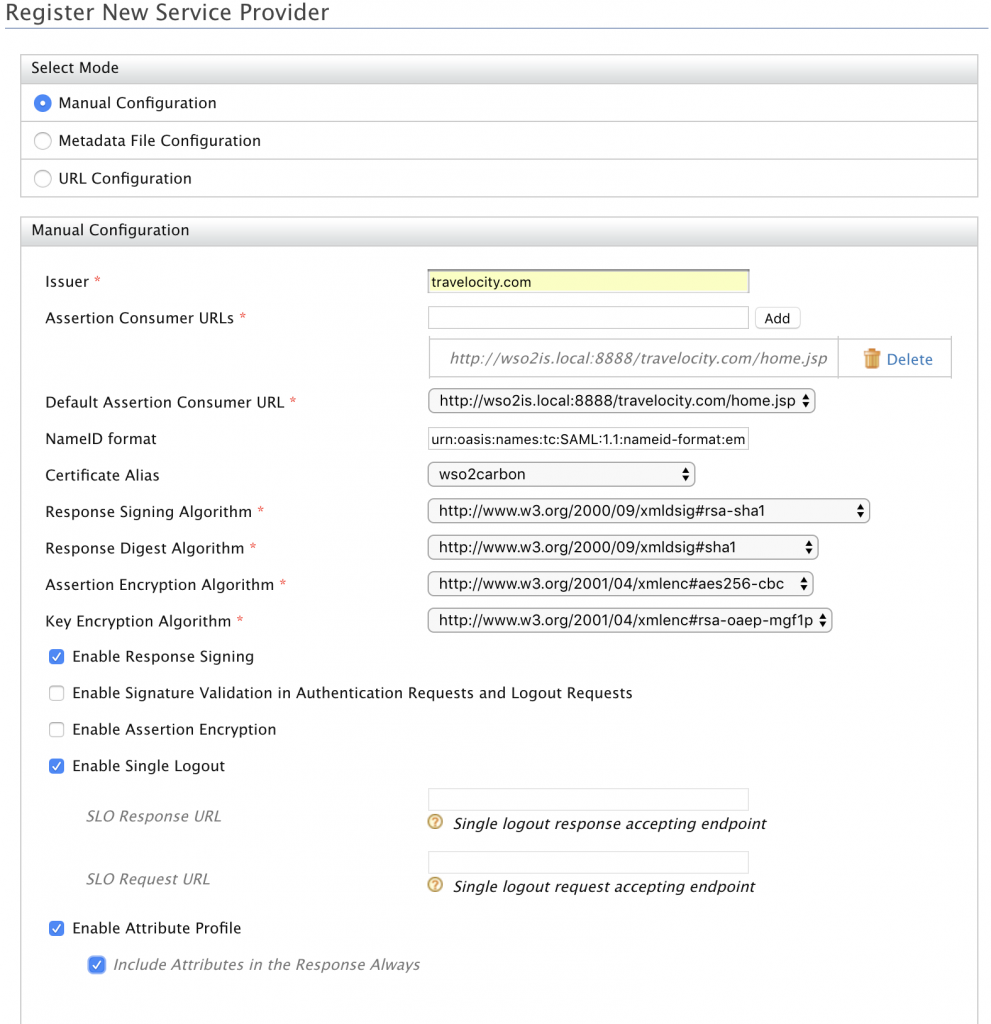
Issuer: It is the identifier of the Service Provider. This value has to match the one we have configured in: travelocity.properties within: SAML2.SPEntityId.
That is to say: travelocity.com
Assertion Consumer URLs: This is the endpoint used by the Identity Provider in the Identity Server to which the responses to the authentication requests of the Service Provider are redirected. It is the Assertion Consumer Service (ACS) of the Service Provider. If the request coming from the Service Provider is signed and contains another ACS URL, the Identity Server will use that other URL as ACS. The value of this field has to match the one we have put in: travelocity.properties within: SAML2.AssertionConsumerURL.
That is to say: http://wso2is.local:8888/travelocity.com/home.jsp
Default Assertion Consumer URL: In this section we can have several Assertion Consumer but we must select the one we are using in: travelocity.properties.
That is to say: http://wso2is.local:8888/travelocity.com/home.jsp
NameID format: This is the format of the information exchanged between SP and the IS, indicated by the NameID format (this and other formats are described in the SALM2 specification). In this way both parties easily identify the format in which they receive the information or the data. In our case, the information that is exchanged is the ’emailAddress’ and the format is: urn:oasis:names:tc:SAML:1.1:nameid-format:emailAddress.
Certificate Alias: The certificate, as you know, is used to validate the requests of the Service Provider in the Identity Server. It is the alias that was used to export the public certificate of the SP. Here is the alias of the certificate that we are going to use for it. Choose: wso2carbon
Response Signing Algorithm: Algorithm (SignatureMethod) used in the signature for the POST binding is indicated. In our case it is:
http://www.w3.org/2000/09/xmldsig#rsasha1
Response Digest Algorithm: The algorithm (DigestMethod) used in the signature for POST binding is indicated. In our case it is: http://www.w3.org/2000/09/xmldsig#sha1
Assertion Encryption Algorithm: An assertion is an information packet related to the Subject (usually the end user): http://www.w3.org/2001/04/xmlenc#aes256-cbc
Key Encryption Algorithm: Encryption algorithm of the SAML2 key. http://www.w3.org/2001/04/xmlenc#rsa-oaep-mgf1p
Enable Response Signing: This is used to sign the returned SAML2 responses after the authentication process is completed. This option is selected to true.
Enable Signature Validation in Authentication Requests and Logout Requests: This indicates whether the identity provider (IdP) must validate the signature of the SAML2 authentication request and the SAML2 session closure request that is sent by the service provider (SP).
Enable Assertion Encryption: This option is to encrypt the SAML 2 assertion or not.
Enable Single Logout: All sessions are terminated once the user closes a server session.
SLO Response URL: This is to use an endpoint other than the assertion consumer. This new endpoint accepts a unique session closing response from the IS.
SLO Request URL: In this section, it indicates the end point of the SP that the IS uses to send session closing requests other than the consumer assertion endpoint.
Enable Attribute Profile: Identity Provider includes the claims selected by the user when configuring the claims of the Service Provider. They are user attributes that are included in the SAML Assertions.
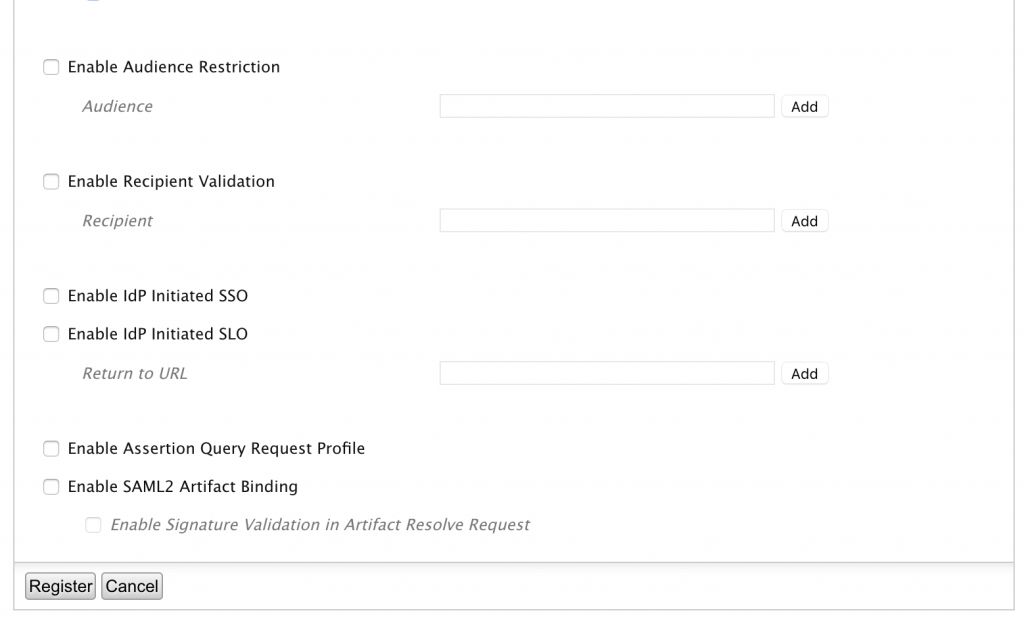
Enable Audience Restriction: Indicates the response receivers of the SAML assertion. In our example we do not put anything.
Enable IdP Initiated SSO: In this case the federated authentication process is initiated when the Identity Provider sends an unsolicited SAML response to the SP. In our case we leave it unselected.
Enable IdP initiated SLO: This option allows the Identity Provider to send SAML2 requests of logout to the SP. In our case we leave it disabled.
Enable Assertion Query Request Profile: With this option you can send SAML2 assertions requests. We do not use it in this case.
– Do you have doubts about how to achieve a successful business integration? Click here –
WSO2 IS Data analysis
WSO2 Identity Server Analytics will allow you to view and analyze statistics related to authentication requests that pass through WSO2 Identity Server. You can configure WSO2 IS to post events related to authentication in WSO2 Identity Server Analytics so that you can see and analyze the following:
- Logon Analysis: includes statistics related to logon attempts made through WSO2 Identity Server. For security reasons, you can not see the statistics related to the login attempts of the administration console and the grant types, such as the password.
- Session analysis: includes statistics related to specific sessions that are created for different applications that are accessed through WSO2 Identity Server.
We already have everything running in the same virtual network with the SP configured in the IS and deployed in Tomcat, and the IS connected to the IS-Analytics. It’s time to analyze the authentication and session operations. For this we use the WSO2 IS Analytics Dashboard that presents statistics related to these activities. But before that we are going to perform some successful and unsuccessful session actions of example to be able to visualize data in the Dashboard Analytics.
To do this go to Tomcat, start the web application travelocity, as shown by the arrow on the right and open the application using the link shown on the left in a new tab in the browser.
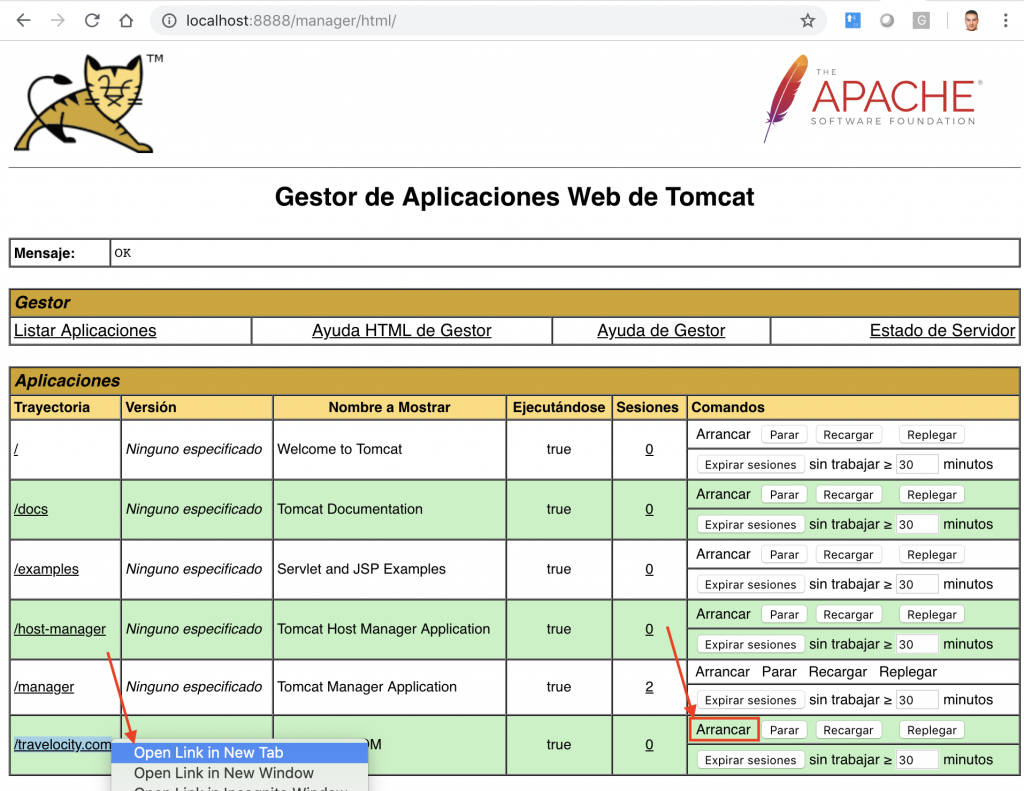
If you select the new tab you can see the Service Provider’s website:
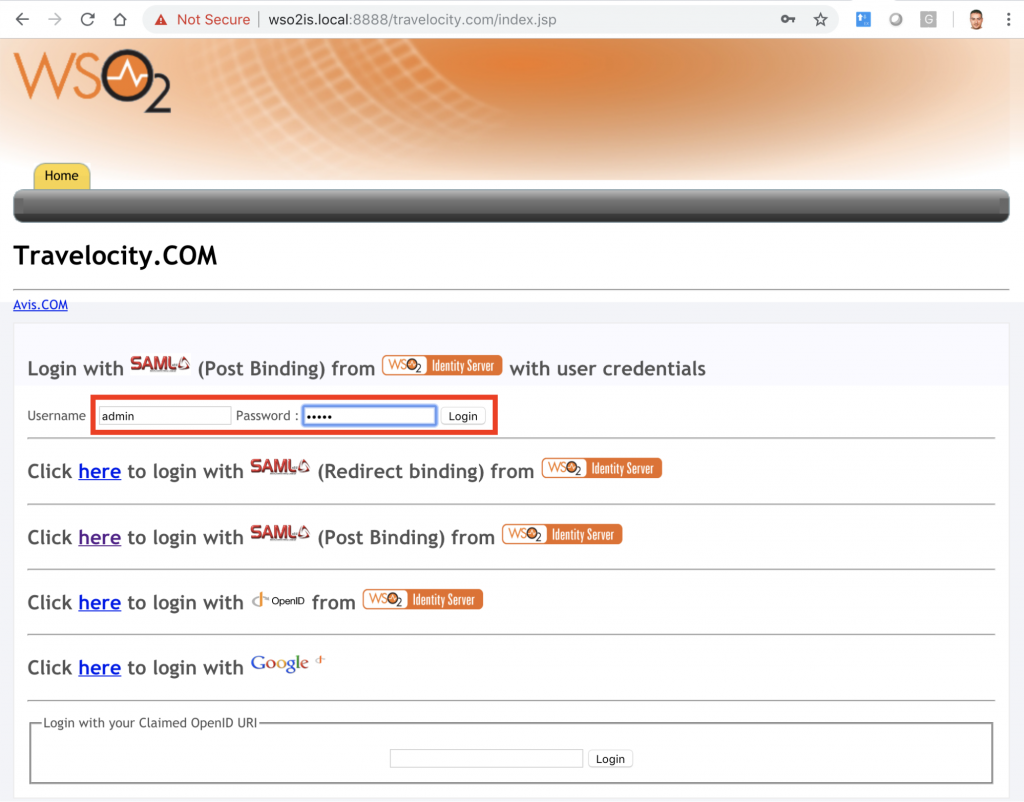
We are going to use SAML2 authentication, for this we must use the first option of the main menu with the user/password: admin/admin. After that the browser is redirected to the IS for the authentication process. If it is satisfactory, the Identity Server redirects the browser to the home of the SP.
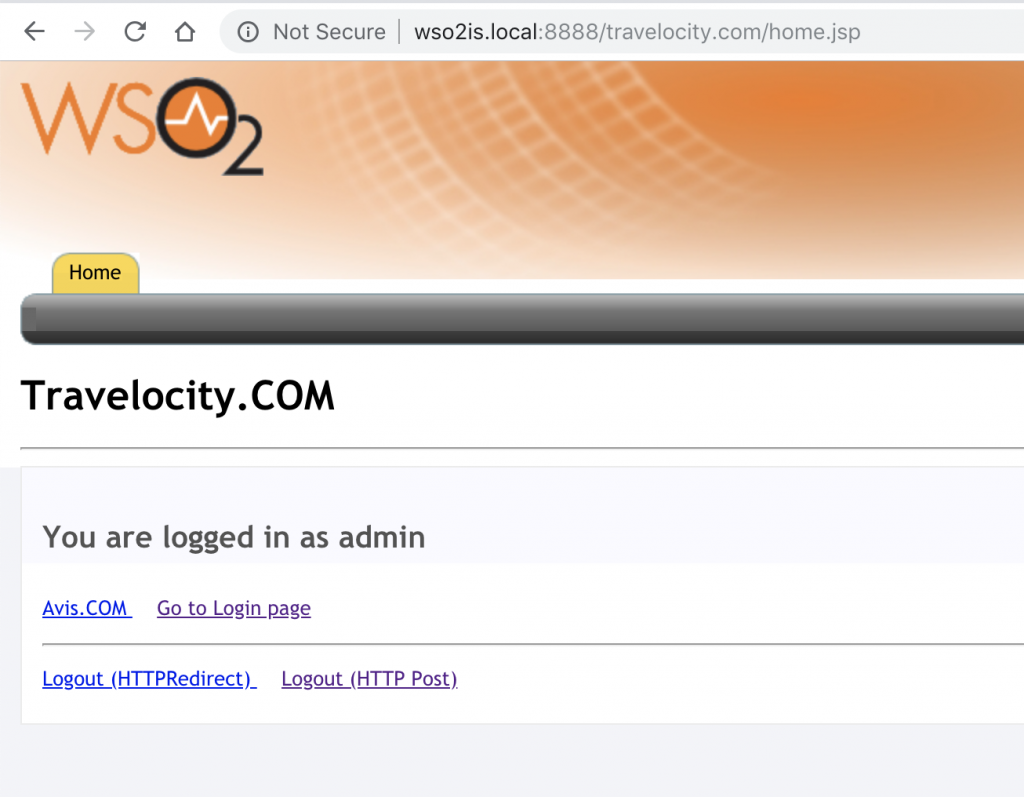
Press Logout (HTTP Post) to exit the session and return to the SP Index screen. Now repeat the process but making several failed session attempts.
Analytics Dashboard
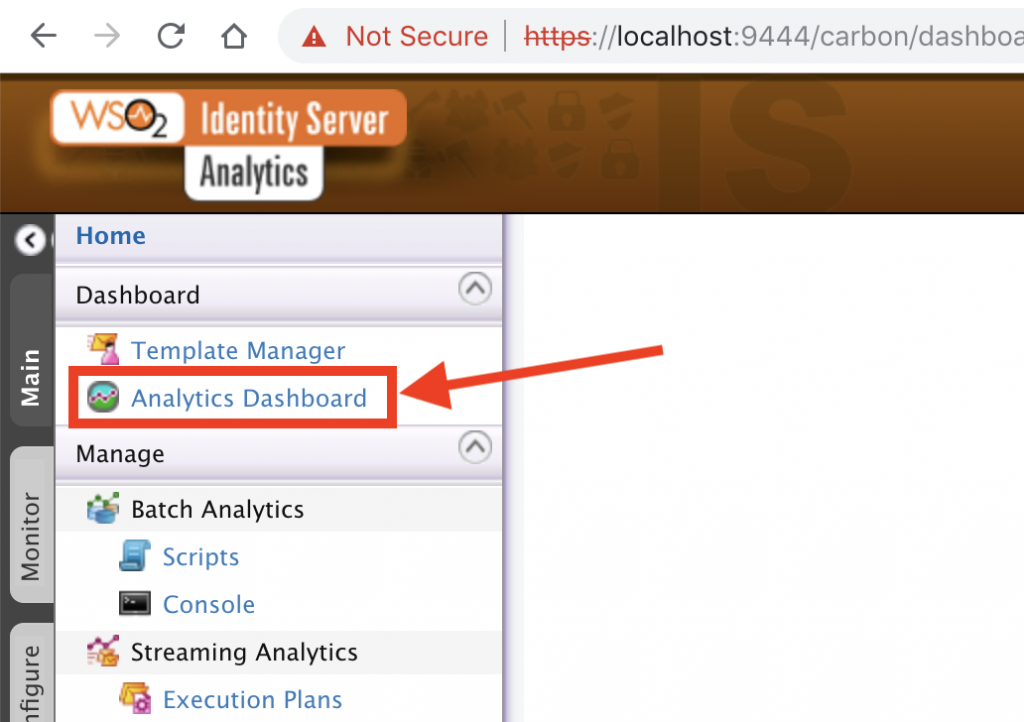
To visualize the data we must go to Identity Server Analytics and select Analytics Dashboard:
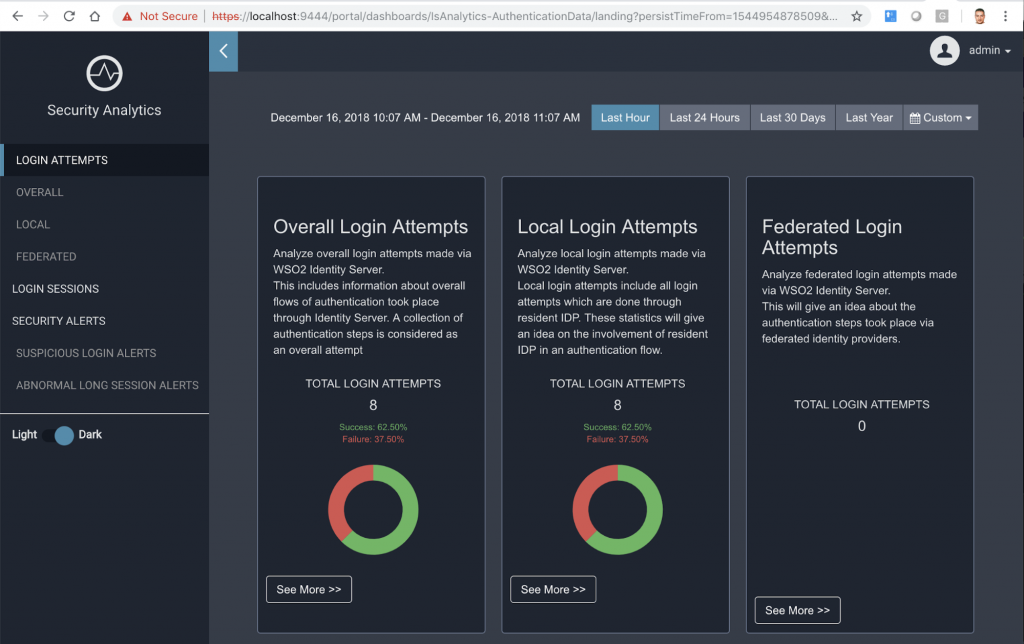
After that, it shows Dashboard Server, select View within Security Analytics.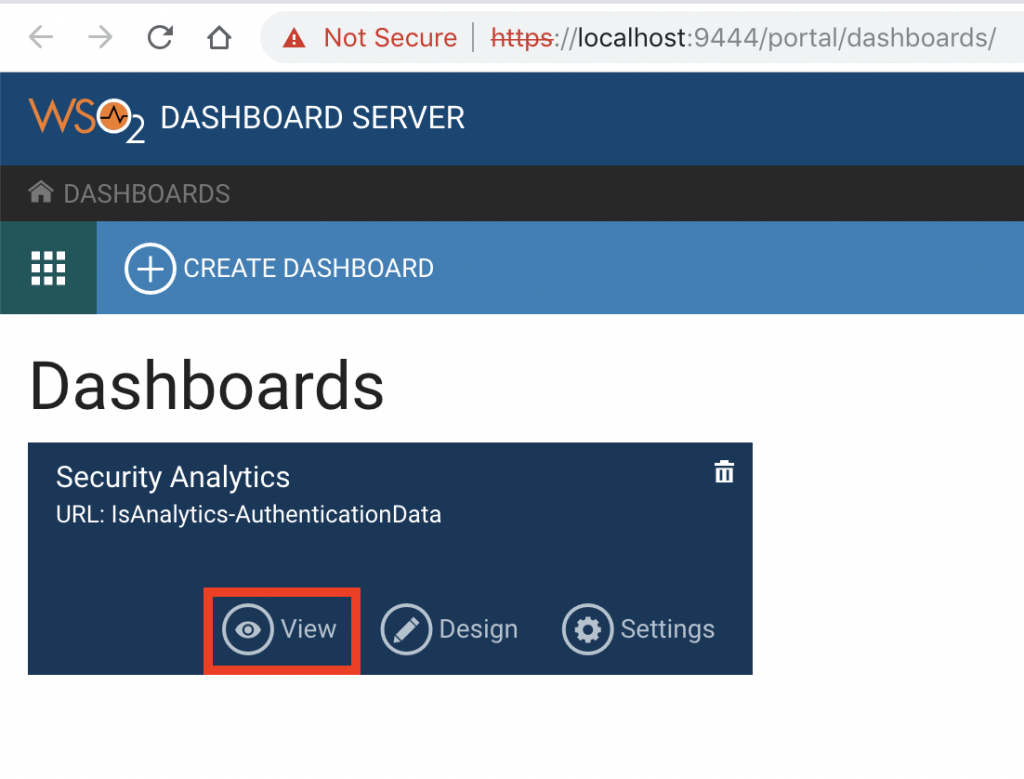 The Analysis Panel appears with a summary of general login attempts, local login attempts, and federated login notifications.
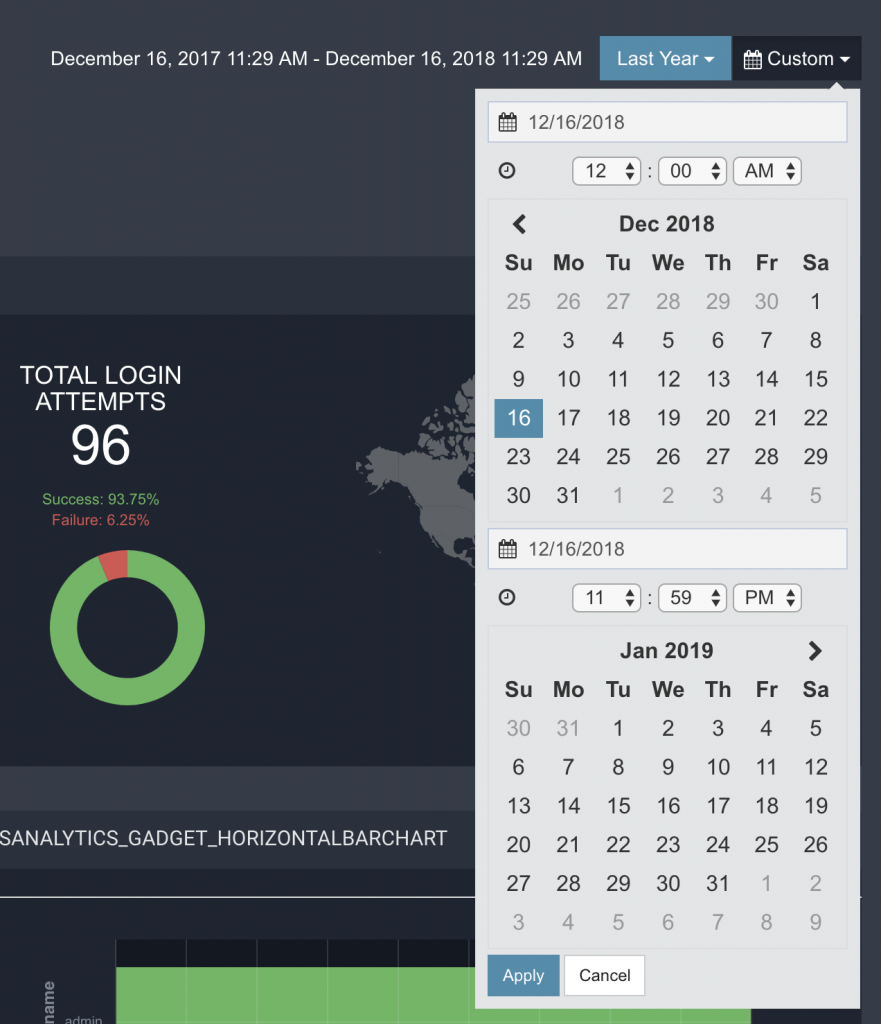
At the top you can apply a filter to select the time from where you want to analyze the data: Last Hour, Last 24 Hours, Last 30 Days, Last Year, or even choose a start and end date in the calendar:
Analysis of general login attempts
If you select See more >> you can see more detailed information about the logins. For example in Overall Login Attempts when selecting See more >> button this is the screen that appears (or left menu, option OVERALL):
As you can see, there is a graph showing the successful authentication attempts and the failed ones, and the time in which each of them occurred. The world map allows you to see the countries from which the session starts were attempted.
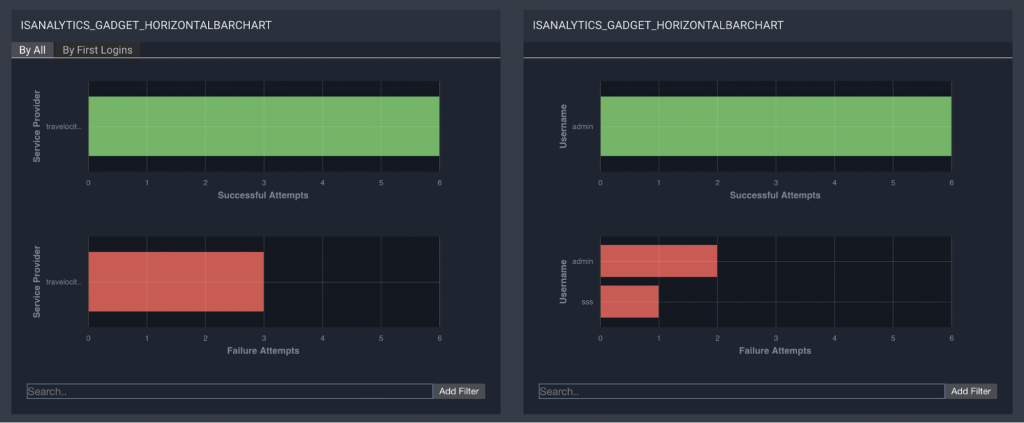
In the intermediate gadget appear data related to the Service Provider (which started the login process) and the attempts both correct and incorrect. On the right there is also an interesting data related to the incorrect username used in the login, in our example the incorrect user was: sss.
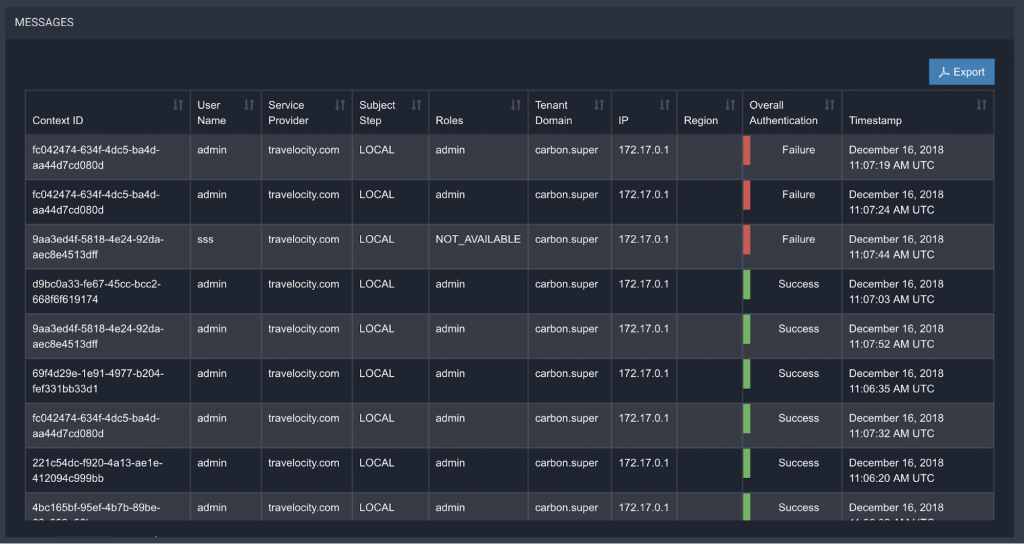
In this same screen at the end a list of the detail in Excel mode of the information of each login action is displayed where Context ID or session identifier is listed, user name used in the login, the Service Provider to which the user tries have access, Subject Step, the role of the user, the tenant, IP, region, login process result, and time in which the process of login attempt was made.
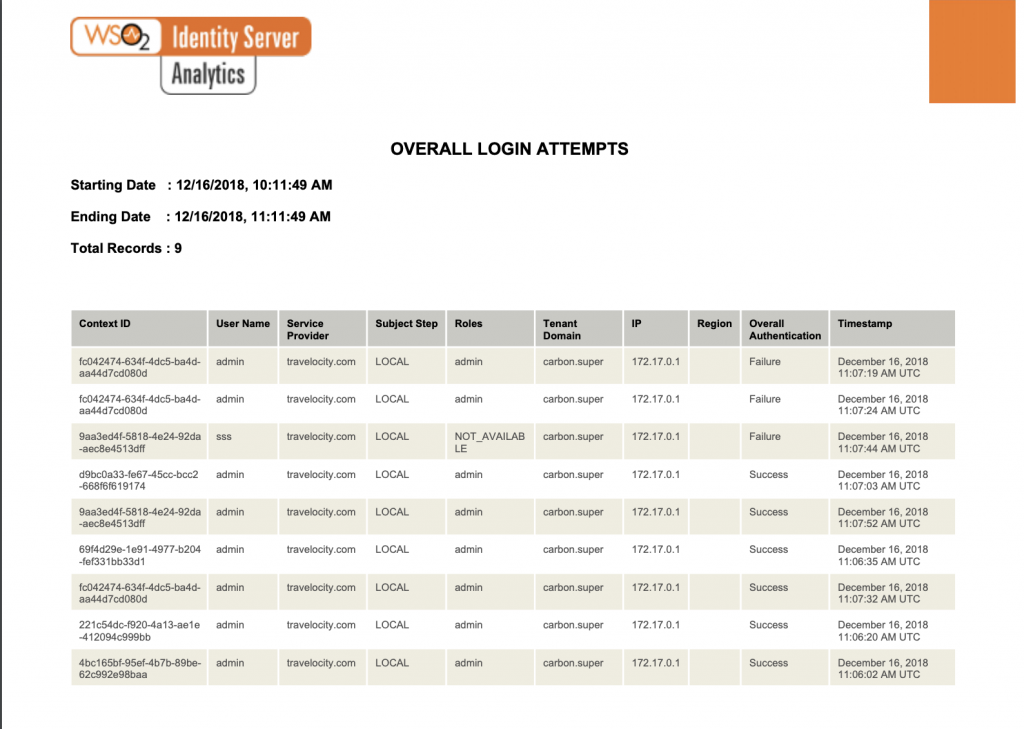
At the top appears a button in blue to export the document in PDF format. A report is generated with this detail:
Analysis of local login attempts
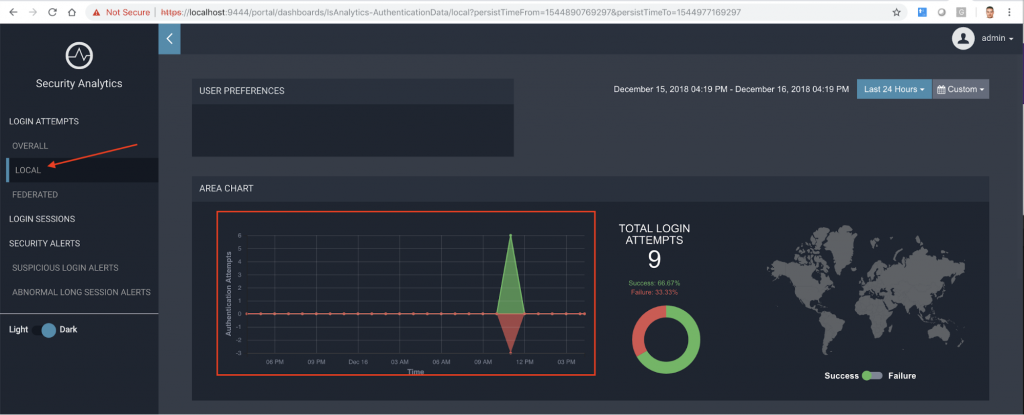
A local authentication is an action that is performed through a local identity provider. The statistics shown on this page include all the local login attempts that are made through local identity providers over time, as well as the local login attempts filtered according to the service providers, the user stores, the roles of users and users.
In the image, specifically in the red box, the total number of attempts to start a local session that are performed during the selected time interval is presented.

This box presents a summary of local login attempts:

This box presents a summary of local login attempts:

Below, on the same screen, graphs showing the successful and unsuccessful local login attempts sorted by the service provider, by domain of the user store, by user role and sorted by user name are displayed:
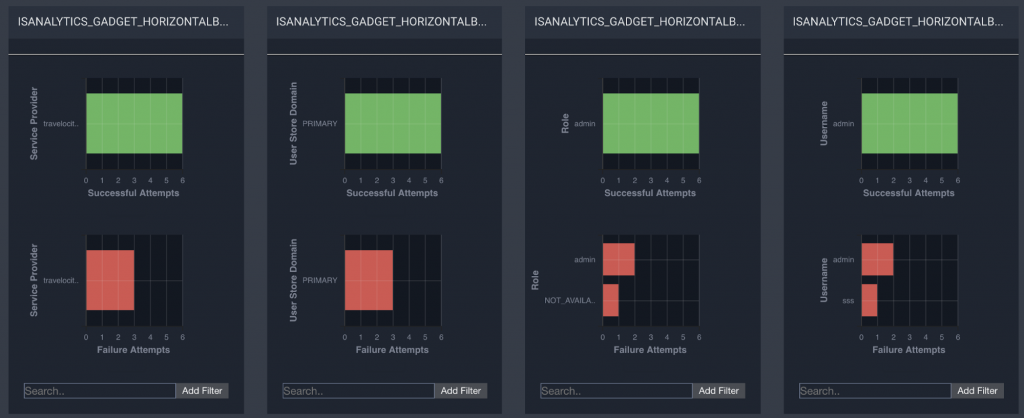
Below is the detail of each attempt to start a local session, also exportable to PDF:

Analysis of federated access attempts
A federated authentication is an authentication activity that is performed through an identity provider external to the IS.
The statistics shown on this page include all federated login attempts that are made through federated identity providers over time, as well as local login attempts filtered by service providers, vendors of identity and users.
In our example, I have not performed any local-only federated authentication. This type of authentication will be explained in future posts.
Session Analysis
This screen shows statistics related to the sessions of the different applications for which it is accessed through WSO2 IS, in our example the application is Travelocity. The upper part of the image shows on the right the currently active sessions that are updated in real time according to the events that come from WSO2 IS.
On the left, the sessions are displayed over the selected time. In total, active, new and completed sessions are shown.
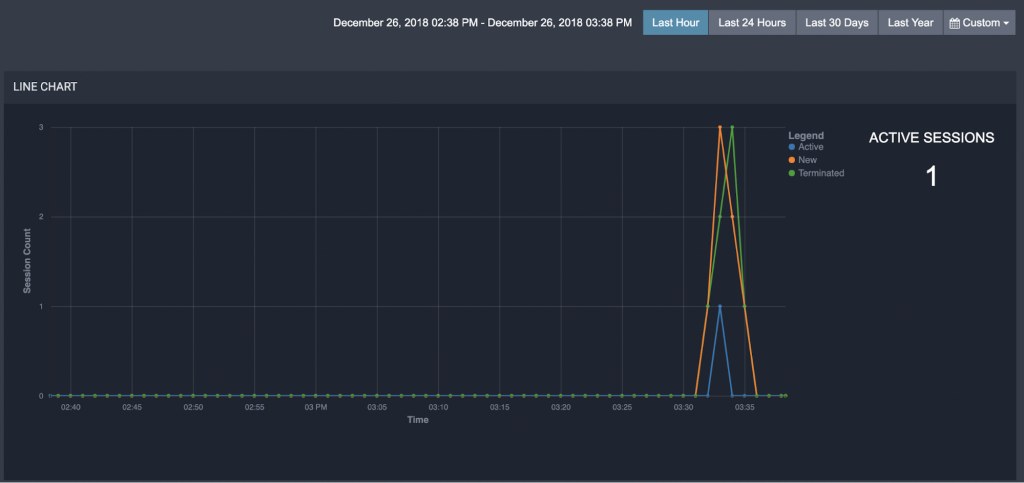
In the following widgets, the longest sessions that took place during a given time interval for the duration of the session are presented. In the center, the average duration of a session based on the most frequent users for the selected time interval. And at the end on the right the sessions are grouped by duration and shows the number of sessions for each group during the given time interval.
Below there are details of each session including: Name of the user who made the session, the start and end time of the session (event of closing session or forced termination).
– Break! Grow your business with Open Source APIs. How? Discover it here –
The end time of the session, that is, the time at which the session is supposed to end, the duration of the session, whether the session is currently active or not, the domain of the user store, the IP address of the server , the domain of the tenant, if the flag to remember is configured or not, the time stamp. All this information is exportable to a PDF file:

Monitoring of authentication operations with alerts
In this section I summarize a series of configurable alerts in files with siddhi extension:
- Suspicious login: A successful login after a certain number of unsuccessful login attempts during a certain time interval.
- Long sessions: The duration of the session of a specific user exceeds a predefined duration of time.
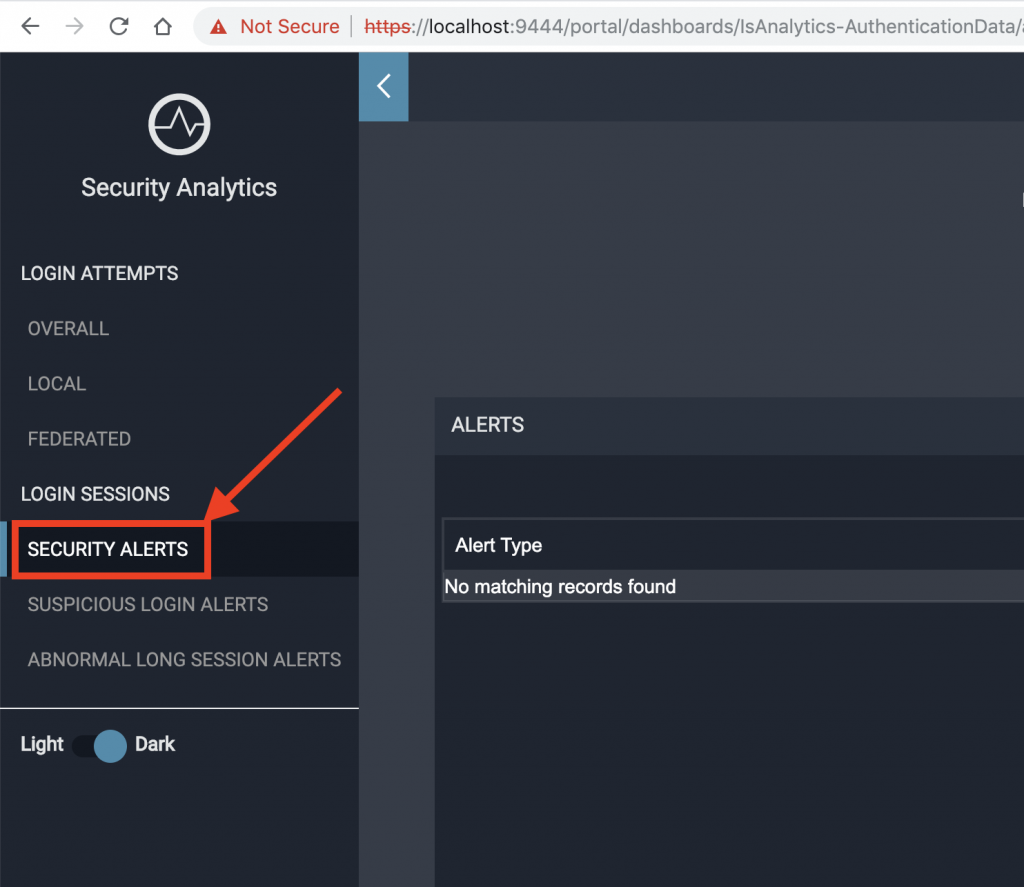
All alerts are visible in the options menu on the left, SECURITY ALERTS:
Conclusion
After all the comments, you should know that we have presented one of the most important parts about the Identity Server, which includes the SSO validation using the SAML 2.0 protocol, with the integration of the Service Provider with the IS and the transmission of IS events to the IS-Analytics.
This last tool has the ability to show in a configurable way a series of data and reports related to SP-IS interaction that help the company to study and analyze these statistical data to make future decisions. This functionality of the tool is extensible and adaptable to new patterns defined by the business.
We have also been able to perform this demonstration with Docker containers and virtual networks, allowing us to see the flexibility and simplicity of Docker tool to be able to visualize any type of pattern that we want to model, both in the interaction of components and in the creation of virtual networks.
And now we must keep trying playing with the tool and the possible configurations of the alerts, a topic that did not need to be extended here. But after all the work done so far the reader will find it much easier to experiment on their part.
In the next chapters on WSO2 Identity Server we will continue to explore in more detail the Identity Server tool and other menu options and security management with other protocols. You are ready? Read us in the next post.
In case you can not wait for the next one and need advice or help to incorporate WSO2 Identity Server in your company, do not hesitate to get in touch with our team.

