
n8n automation lets you connect applications, databases and APIs to run tasks automatically through workflows.
Instead of carrying out every step in a process manually, n8n lets you define:
- what event starts the process,
- how the data is processed, and
- what actions should happen next.
n8n is a low-code workflow automation tool that combines a visual, node-based interface with the option to add custom logic when a process requires it.
It can be used to integrate services, query databases, transform data in JSON, work with APIs and orchestrate automations across different systems.
In this guide, we explain how n8n automation works and walk through an example workflow step by step, connecting a MySQL database to a REST API.
It is important to note that this example was created purely for educational purposes to demonstrate how the tool works. It is not based on a real use case or a specific project.
What is n8n?
n8n is a process automation tool that lets you build custom workflows to connect applications, services, databases and APIs.
Each workflow is made up of nodes. Every node performs a specific task, for example:
- starting an automation;
- querying a database;
- transforming data;
- making an HTTP request;
- sending information to another system.
In this way, n8n acts as an orchestration layer between different tools and helps automate processes that would otherwise require manual steps or more complex integration development.
It can also be deployed both on-premises and in cloud environments, giving organisations flexibility when integrating their systems.
How does n8n automation work?
n8n automation works through workflows made up of interconnected nodes.
In general, a workflow follows this logic:
- A trigger starts the process. This can be a scheduled event, a webhook or a manual execution.
- n8n retrieves information from a source. For example, a database, an API or an external application.
- The data is transformed if necessary. This lets you adapt the information to the format required by the next system.
- An action is performed. For example, creating a record, sending data to an API or triggering another process.
This structure makes n8n particularly useful when a process depends on several systems and needs intermediate logic to move, transform or enrich information.
You may also be interested in: Why choose n8n for business automation in Spain?
What processes can you automate with n8n?
n8n can be used to automate many different types of processes, especially those that involve connecting tools or running repetitive sequences of actions.
For example, you can use it to:
- query data from a database;
- send information to an API;
- transform JSON structures;
- schedule recurring tasks;
- synchronise data between platforms;
- automate workflows between internal and external applications.
In this article, we will focus on one of these scenarios: an example workflow that retrieves data from MySQL, transforms it and sends it to a REST API using a POST request.
Set up n8n with Docker Compose
Docker Compose is a useful way to run the n8n server and all the back-end services it needs, such as the database or REST API, in a single, easy-to-manage environment.
For this example workflow, we will define the following services:
- MySQL service: used to store and retrieve products from a database.
- API service: provides an endpoint that returns a JSON response when a new product is created.
- n8n service: runs the process that integrates all the services and performs the required actions.
The docker-compose.yml file looks like this:
version: ‘3.8’
services:
# n8n
n8n:
image: n8nio/n8n
ports:
– “5678:5678”
environment:
– N8N_BASIC_AUTH=true
– N8N_BASIC_AUTH_USERNAME=myusername
– N8N_BASIC_AUTH_PASSWORD=mypassword
# MySQL
mysql:
image: mysql:latest
restart: always
environment:
– MYSQL_ROOT_PASSWORD=mypassword
– MYSQL_DATABASE=mydatabase
– MYSQL_USER=myuser
– MYSQL_PASSWORD=mypassword
ports:
– “3306:3306”
volumes:
– ./scripts/mysql:/docker-entrypoint-initdb.d
# REST API
api:
build:
context: ./simple-api-rest
dockerfile: Dockerfile
ports:
– “3000:3000”
command: npm run start
Next, clone the repository and select the folder for the example application. Then run:
docker compose build
This will create the image for the REST API application.
Next, run:
docker compose pull
This will pull the n8n and MySQL images.
Finally, start the services with:
docker compose up
Once this is done, the environment will be ready for you to work with this n8n automation example.
Example workflow in n8n
The example workflow used in this guide contains a sequence of connected nodes that collect information about products created in a MySQL database during the previous day.
The data is then transformed to create a JSON request and sent to a specific endpoint through an HTTP POST request.
The workflow follows this sequence:
Schedule Trigger → Date & Time → MySQL → Edit Fields → HTTP Request
This workflow clearly demonstrates three key n8n capabilities:
- automating recurring processes;
- transforming data between systems;
- orchestrating integrations between a database and an API.
Before looking at the workflow in detail, you need to import it into your n8n instance:
- Go to http://localhost:5678/ and skip the initial setup.
- Click to create a new workflow from scratch.
- In the settings, select Import from URL and enter the URL of the workflow JSON stored on GitHub.
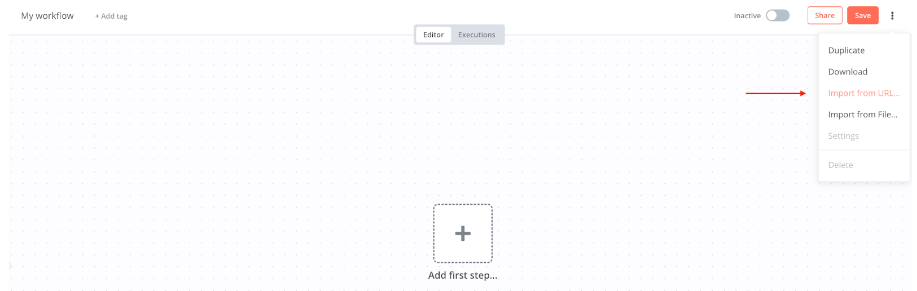
Figure 1. Workflow in detail
4. Finally, save the workflow.
From there, you can review each node and understand the role it plays in the automation.
Schedule Trigger
The Schedule Trigger node lets you configure how often and when the workflow should run.
In this example, the trigger is set to run the automation once a day. Its purpose is to start the process automatically without any manual intervention.
This node is the starting point of the workflow. It launches the process according to the defined schedule and starts the sequence of steps that connects the database to the REST API.
Date & Time node
The Date & Time node is a flexible tool for working with date and time values.
It is particularly useful in time-dependent automations or when dates need to be transformed before they are used in other nodes.
In this example workflow, it is used to retrieve the workflow start timestamp and convert it to the UTC time zone.
Using {{ }}, we can use JavaScript in node parameters. We can also access values from the previous item with the $json operator. In this case, we need to access the timestamp from the input item.
In the Property Name field, we choose the name of the output element where the conversion result will be stored. In this example, the property is called fromDatetime.
We also enable the Custom Format option to specify the output format: YYYY-MM-DDTHH:mm:ss.SSSZ.
Under Options, we use the following parameters:
- To Timezone Name or ID, with the time zone set to UTC;
- From Format, with the format of the input value.
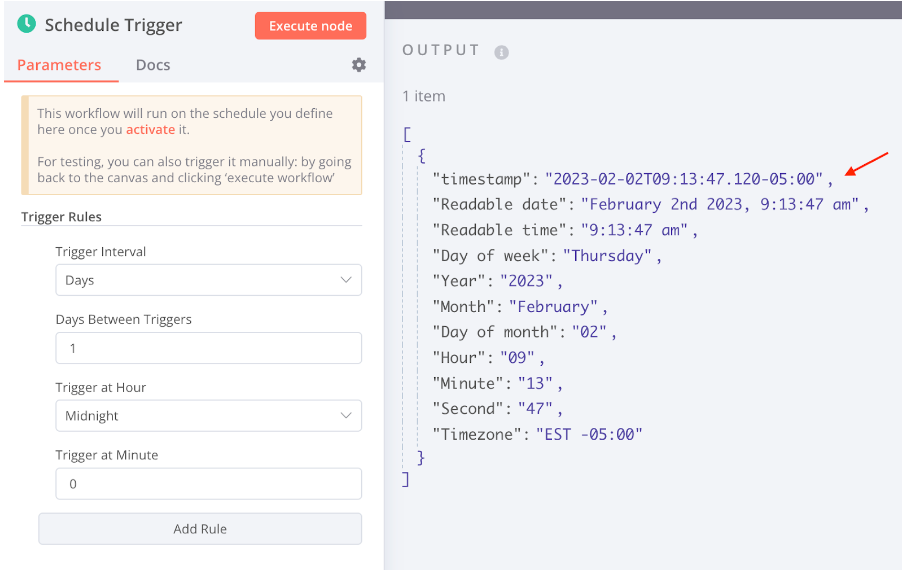
Figure 2. Date Format
When you run this node, you can see the fromDatetime property appear in the output item. This value will be important in the next step of the workflow:
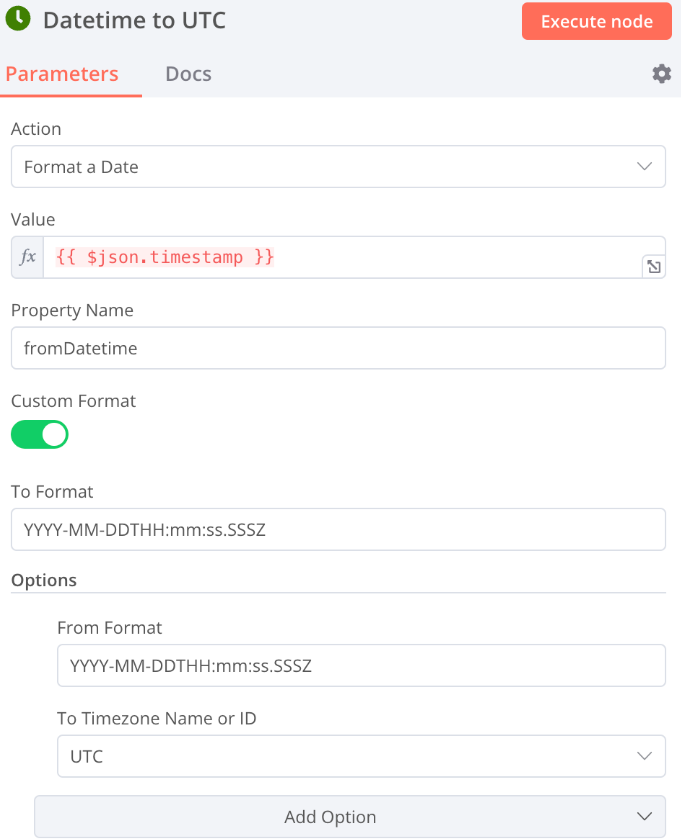
Figure 3. Date format II
MySQL node
The MySQL node lets you run a query against the database.
In this example, it is configured to run a query that selects all rows from the products table created during the previous day. The query uses the UTC date and time generated by the preceding node.
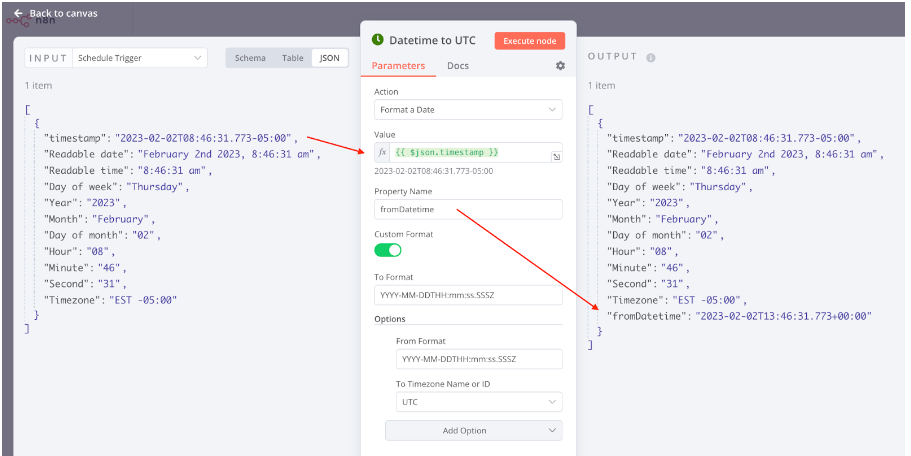
Image 4. MySQL
This step is important because it shows how n8n can retrieve information from a database and use it as the basis for continuing the automation process.
If the node appears in red, it is because it needs credentials to connect to MySQL. To configure it:
- Click Create New Credential.
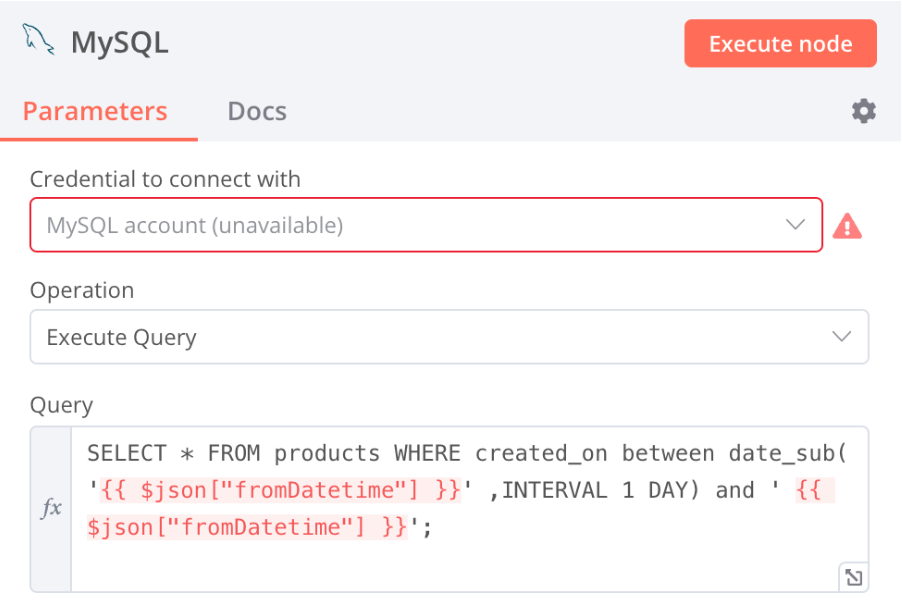
Figure 5. MySQL credentials
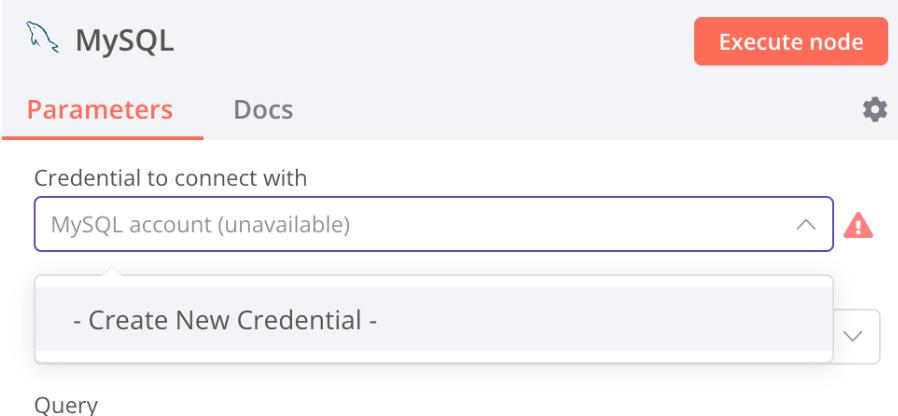
Figure 6. MySQL Account
2. Enter the database connection details.
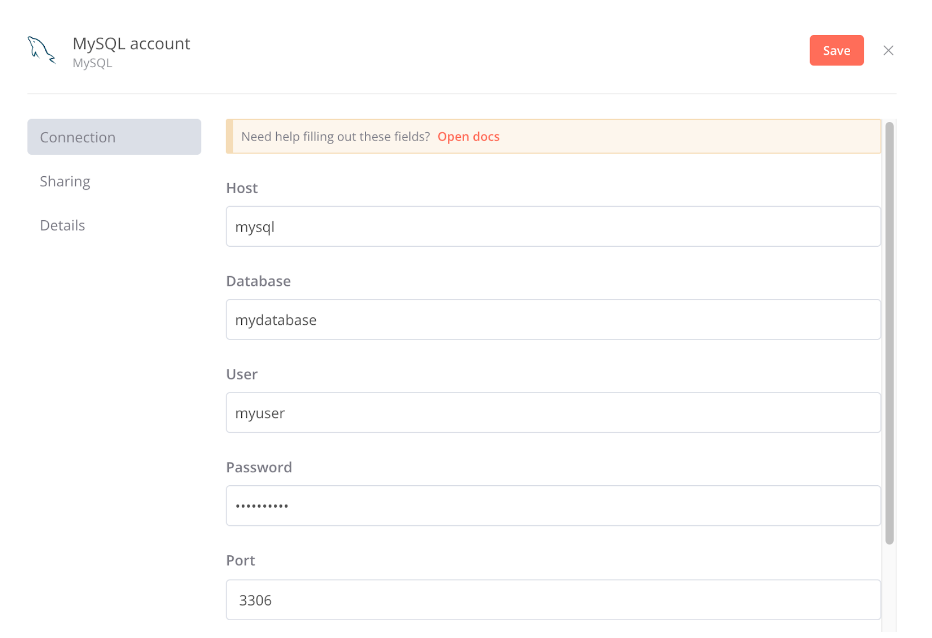
Figure 7. Execution node
3. Save the credentials.
4. Return to the MySQL node and run it manually.
Once correctly configured, the node will return the records retrieved from the products table.
Configure the transformation node
After retrieving the data from MySQL, the next step is to transform it into the format required by the destination API.
To do this, we use the Edit Fields node, which lets you set or modify the values of incoming data. For example, you can:
- update a value,
- combine strings, or
- change the output structure.
In this case, the node is used to prepare the request that will later be sent to the REST API.
This node generates the structure of the API call.
Enable the Keep only set option to generate an output item containing only the values configured in the node. If you do not, the default behaviour will copy the input properties to the output.
It is also useful to enable Dot notation, as this changes how properties are generated. When enabled, setting the xxx.yyy property to the value zzz will produce:
{ “xxx”: { “yyy”: “zzz” } }
If it is not enabled, the result would be:
{ “xxx.yyy”: “zzz” }
Because the request we want to send to the API to create a product has a structure like this:
{
“item”: {
“nameProduct”: “Some Product”,
“priceItem”: “10”
}
}
we will set the values needed in the node to build that output.
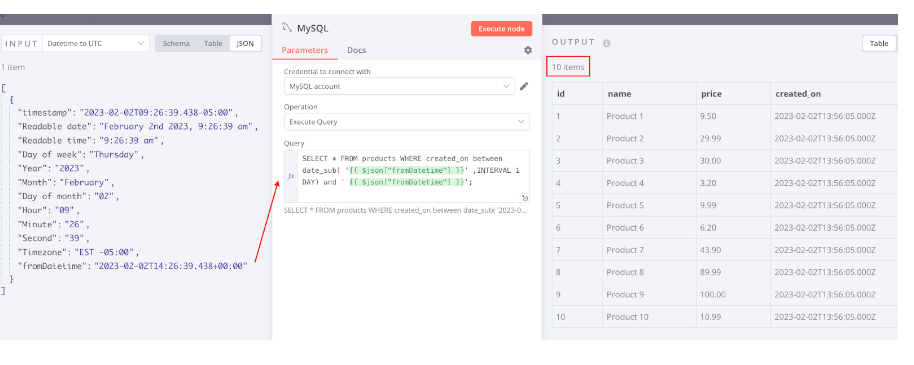
Figure 8. Prepare request
When you run the node manually, you can see that it applies its logic to each input item and produces output ready to be sent to the API.
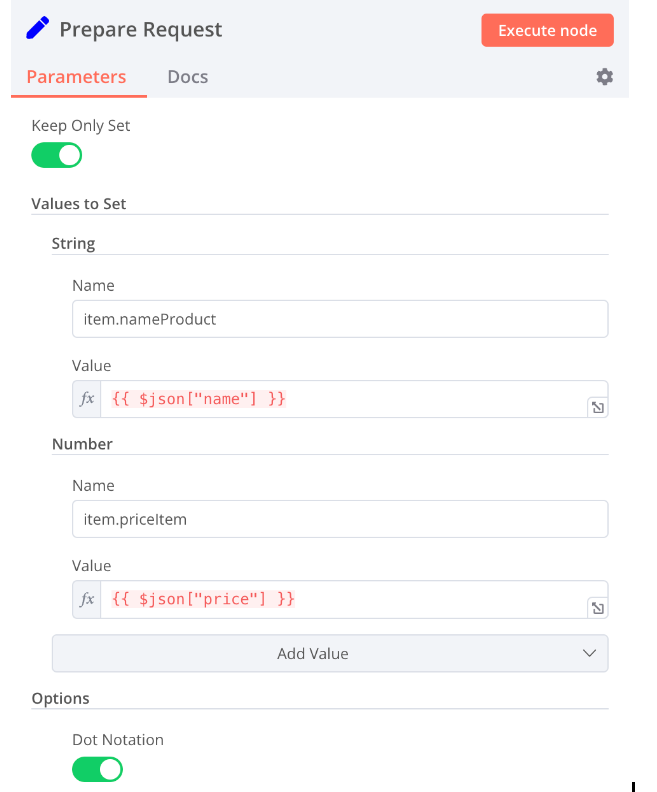
Figure 9. Input items
If we force the execution we can see how a node executes its logic for each of the input items:
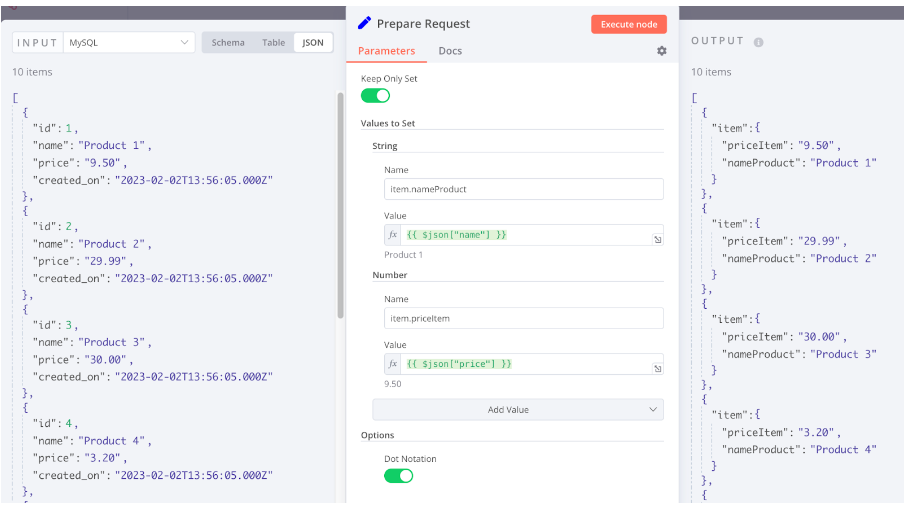
Figure 10. Input items
HTTP request node
The HTTP Request node is used to make an HTTP request to a specific URL. It can retrieve data from external APIs and communicate with web services.
In this example workflow, we use it to send a POST request to the API in order to create the products retrieved from the database.
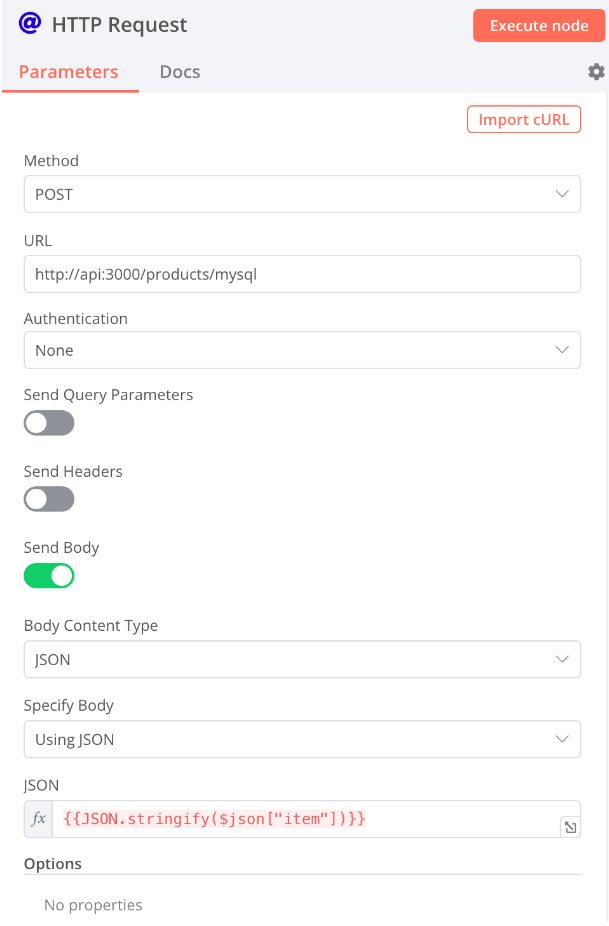
Figure 11. HTTP request
Its configuration defines:
- the HTTP method;
- the endpoint URL;
- the configuration required to send the JSON body.
The JavaScript code used to set the JSON parameter is:
{{ JSON.stringify($json[“item”]) }}
With this configuration, the node takes the object prepared in the previous step and sends it to the corresponding endpoint.
If you run it manually, you can check that the calls are completed successfully for all the input items processed by the workflow.

Figure 12. HTTP request II
Activate the workflow
Up to this point, the workflow has been run manually, node by node, to check that each step works correctly.
However, if you want the automation to run independently according to the schedule you have set, you need to activate the workflow.
To do this, simply use the activation control at the top of the screen. Once activated, the workflow will run automatically according to the frequency configured in the Schedule Trigger.
This is the step that turns the example into an operational automation, as it no longer depends on manual executions.

Figure 13. My workflow
What this example workflow demonstrates
Although this workflow was created purely for educational purposes, it provides a clear picture of how n8n works in practice.
This example shows that n8n can:
- connect a database to a REST API;
- retrieve information on a schedule;
- transform data before sending it to another system;
- automate repetitive tasks without running each step manually;
- build integrations visually using nodes.
In other words, this is not a real use case. It is an example workflow designed to show how the tool coordinates different services within a single flow.
What should you check before taking a workflow into production?
A workflow may work correctly in a test environment, but that does not mean it is ready to run in production.
Before taking an n8n automation into a live environment, you should review at least the following areas:
Credential management
It is important to define how the credentials needed to access databases, APIs and other services are stored and protected.
Error handling
A workflow should account for what happens:
- if a query fails,
- if an API does not respond, or
- if the data does not arrive in the expected format.
Monitoring
When a workflow runs automatically, it is essential to have visibility into its executions, errors and results.
Changes to connected systems
If the database structure, an API endpoint or the format of a response changes, the workflow may need to be adjusted.
Scalability and maintenance
The more critical or frequent the process is, the more important it becomes to review the workflow design and ensure it can remain secure and stable over time.
n8n automation is an effective way to connect applications, databases and APIs within workflows that automatically execute a sequence of tasks.
In this article, we have looked at an example workflow in which n8n retrieves data from MySQL, transforms it and sends it to a REST API using an HTTP POST request.
The aim has been to explain, in practical terms, how nodes work and how to build an automation step by step.
These types of workflows show that n8n can automate individual actions while also acting as an orchestration layer between different systems.
At Chakray, we help organisations design and implement automations and integrations that connect applications, APIs and systems at scale, while keeping control of processes and data.
If you need support with an automation or integration project, get in touch with our team.
Frequently asked questions about n8n automation
What is n8n automation?
n8n automation is the use of n8n to create workflows that connect applications, databases and APIs so tasks can run automatically according to defined logic.
What is a workflow in n8n?
A workflow is a sequence of connected nodes. Each node performs a specific action, such as starting a process, retrieving data, transforming it or sending it to another system.
Do you need to know how to code to use n8n?
Not necessarily. n8n lets you create many workflows through a visual interface. However, knowledge of APIs, JSON, JavaScript or databases is useful for more advanced automations.
What types of processes can be automated with n8n?
You can automate integration processes, data synchronisation, database queries, sending information to APIs, scheduled tasks and other workflows between systems.
What role does MySQL play in this example?
In this example workflow, MySQL acts as the data source. The products are retrieved from the database, transformed and then sent to the REST API.
What does the HTTP Request node do?
The HTTP Request node can send or retrieve information from a URL. In this case, it is used to send a POST request to a REST API.
Why is Docker Compose used in this example?
Docker Compose makes it easier to run n8n, MySQL and the REST API together in a single environment, simplifying the setup of the example.
If you need help with it, do not hesitate to contact us!


Automate your most time consuming and costly processes and activities
Talk to our experts!
contact us about automation